Technology
- Databases
Elastic searchIndex Versioning Overview Indexes can be versioned. These versions will handle breaking data changes. To facilitate this the repositories will use an alias. This alias allows us to couple the most recent version of the version on an elastic level. The mechanism used for this is called reindex . Backup the current index To kick of our changes, we will first reindex the existing index. We will add a version number on the end.
- Elastic search
Index Versioning Overview Indexes can be versioned. These versions will handle breaking data changes. To facilitate this the repositories will use an alias. This alias allows us to couple the most recent version of the version on an elastic level. The mechanism used for this is called reindex . Backup the current index To kick of our changes, we will first reindex the existing index. We will add a version number on the end.
- Elastic search
- Kubernetes
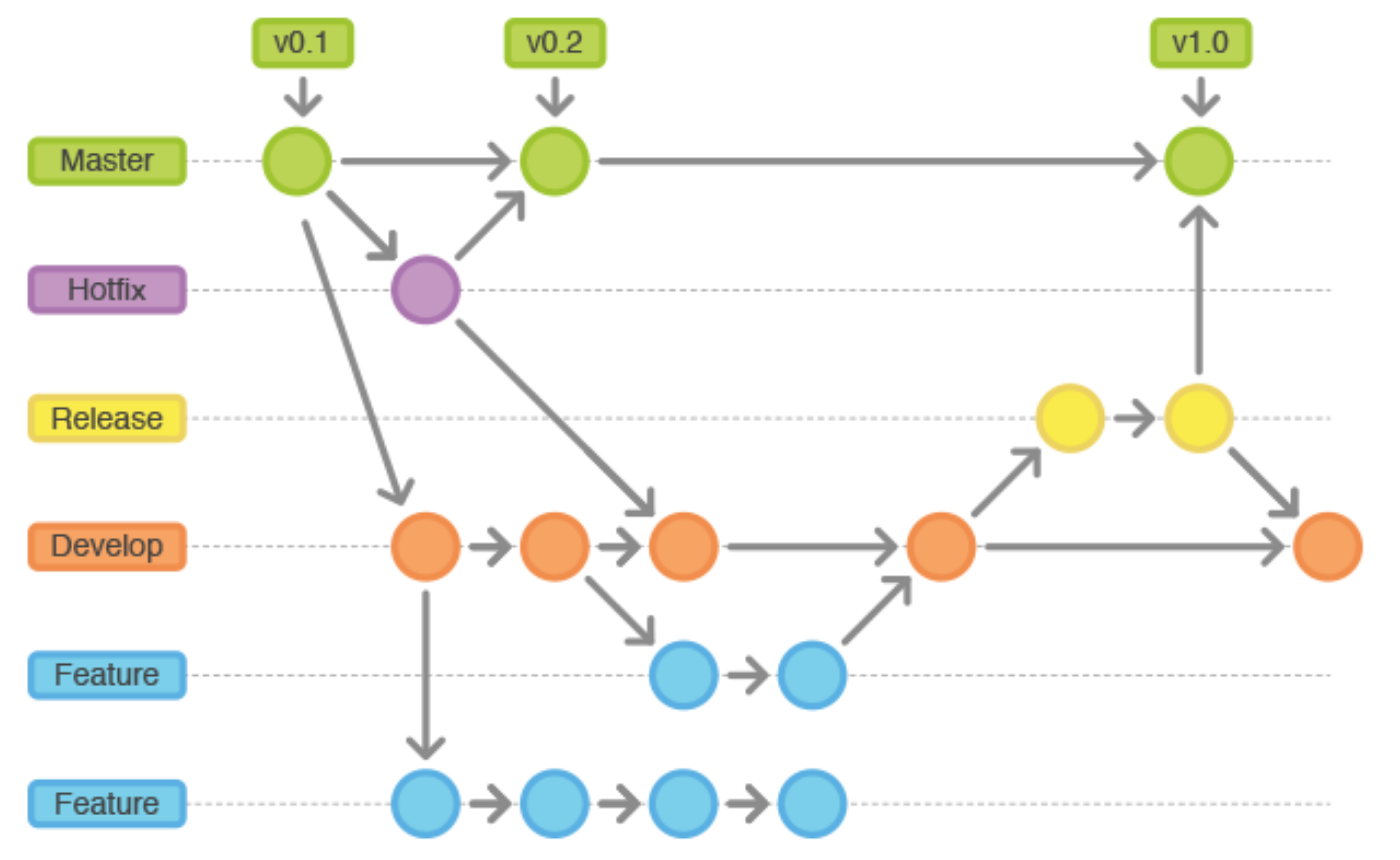
- Release management
Release management is the process of versioning changes and moving new versions through all environments. Each environment has its characteristics and purpose. Additionally it’s important to have good release notes to track all the changes throughout the software lifecycle. Environments Production environment Our production environment is the most important environment. It houses paying customers and holds sensitive data. Security is a great concern here. The requirements of this environment are
- Open Source
- Tools
GithubGithub provides a lot of functionality out of the box for a small fee. It is true that choosing other providers might offer additional functionality, but this mostly comes at a price. As an enterprise the decision really depends on the added value of the functionality. This mostly boils down to reporting, visualization and ease of use. In beginning projects I would advocate to use Github and the functionality it offers to the fullest.
- Github
Github provides a lot of functionality out of the box for a small fee. It is true that choosing other providers might offer additional functionality, but this mostly comes at a price. As an enterprise the decision really depends on the added value of the functionality. This mostly boils down to reporting, visualization and ease of use. In beginning projects I would advocate to use Github and the functionality it offers to the fullest.
- Gita
Gita is a wonderful tool that helps in managing multiple repositories as one. If you find yourself doing a lot of git actions through the command line. Check out this awesome tool. GithubGita Gita: a command-line tool to manage multiple git repos This tool has two main features display the status of multiple git repos such as branch, modification, commit message side by side (batch) delegate git commands/aliases and shell commands on repos from any working directory In this screenshot, the gita ll command displays the status of all repos.
- Github
|
|
|
|
---
title: Example Diagram
---
graph LR;
A[Hard edge] -->|Link text| B(Round edge)
B --> C{<strong>Decision</strong>}
C -->|One| D[Result one]
C -->|Two| E[Result two]
%%{init:{"fontFamily":"monospace", "sequence":{"showSequenceNumbers":true}}}%%
sequenceDiagram
Alice->>John: Hello John, how are you?
loop Healthcheck
John->>John: Fight against hypochondria
end
Note right of John: Rational thoughts!
John-->>Alice: Great!
John->>Bob: How about you?
Bob-->>John: Jolly good!
classDiagram
    Animal <|-- Duck
    Animal <|-- Fish
    Animal <|-- Zebra
    Animal : +int age
    Animal : +String gender
    Animal: +isMammal()
    Animal: +mate()
    class Duck{
      +String beakColor
      +swim()
      +quack()
    }
    class Fish{
      -int sizeInFeet
      -canEat()
    }
    class Zebra{
      +bool is_wild
      +run()
    }
%%{init:{"theme":"forest"}}%%
erDiagram
CUSTOMER }|..|{ DELIVERY-ADDRESS : has
CUSTOMER ||--o{ ORDER : places
CUSTOMER ||--o{ INVOICE : "liable for"
DELIVERY-ADDRESS ||--o{ ORDER : receives
INVOICE ||--|{ ORDER : covers
ORDER ||--|{ ORDER-ITEM : includes
PRODUCT-CATEGORY ||--|{ PRODUCT : contains
PRODUCT ||--o{ ORDER-ITEM : "ordered in"
journey
title My working day
section Go to work
Make tea: 5: Me
Go upstairs: 3: Me
Do work: 1: Me, Cat
section Go home
Go downstairs: 5: Me
Sit down: 3: Me
gantt
dateFormat  YYYY-MM-DD
title Adding GANTT diagram functionality to Mermaid
section A section
Completed task            :done,    des1, 2014-01-06,2014-01-08
Active task               :active,  des2, 2014-01-09, 3d
Future task               :         des3, after des2, 5d
Future task2              :         des4, after des3, 5d
section Critical tasks
Completed task in the critical line :crit, done, 2014-01-06,24h
Implement parser and jison          :crit, done, after des1, 2d
Create tests for parser             :crit, active, 3d
Future task in critical line        :crit, 5d
Create tests for renderer           :2d
Add to Mermaid                      :1d
pie title Pets adopted by volunteers
"Dogs" : 386
"Cats" : 85
"Rats" : 15
quadrantChart
    title Reach and engagement of campaigns
    x-axis Low Reach --> High Reach
    y-axis Low Engagement --> High Engagement
    quadrant-1 We should expand
    quadrant-2 Need to promote
    quadrant-3 Re-evaluate
    quadrant-4 May be improved
    Campaign A: [0.3, 0.6]
    Campaign B: [0.45, 0.23]
    Campaign C: [0.57, 0.69]
    Campaign D: [0.78, 0.34]
    Campaign E: [0.40, 0.34]
    Campaign F: [0.35, 0.78]
requirementDiagram

    requirement test_req {
    id: 1
    text: the test text.
    risk: high
    verifymethod: test
    }

    element test_entity {
    type: simulation
    }

    test_entity - satisfies -> test_req
gitGraph
commit
commit
branch develop
checkout develop
commit
commit
checkout main
merge develop
commit
commit
C4Context
title System Context diagram for Internet Banking System
Enterprise_Boundary(b0, "BankBoundary0") {
Person(customerA, "Banking Customer A", "A customer of the bank, with personal bank accounts.")
Person(customerB, "Banking Customer B")
Person_Ext(customerC, "Banking Customer C", "desc")

    Person(customerD, "Banking Customer D", "A customer of the bank, <br/> with personal bank accounts.")

    System(SystemAA, "Internet Banking System", "Allows customers to view information about their bank accounts, and make payments.")

    Enterprise_Boundary(b1, "BankBoundary") {

        SystemDb_Ext(SystemE, "Mainframe Banking System", "Stores all of the core banking information about customers, accounts, transactions, etc.")

        System_Boundary(b2, "BankBoundary2") {
        System(SystemA, "Banking System A")
        System(SystemB, "Banking System B", "A system of the bank, with personal bank accounts. next line.")
        }

        System_Ext(SystemC, "E-mail system", "The internal Microsoft Exchange e-mail system.")
        SystemDb(SystemD, "Banking System D Database", "A system of the bank, with personal bank accounts.")

        Boundary(b3, "BankBoundary3", "boundary") {
        SystemQueue(SystemF, "Banking System F Queue", "A system of the bank.")
        SystemQueue_Ext(SystemG, "Banking System G Queue", "A system of the bank, with personal bank accounts.")
        }
    }
    }

    BiRel(customerA, SystemAA, "Uses")
    BiRel(SystemAA, SystemE, "Uses")
    Rel(SystemAA, SystemC, "Sends e-mails", "SMTP")
    Rel(SystemC, customerA, "Sends e-mails to")

    UpdateElementStyle(customerA, $fontColor="red", $bgColor="grey", $borderColor="red")
    UpdateRelStyle(customerA, SystemAA, $textColor="blue", $lineColor="blue", $offsetX="5")
    UpdateRelStyle(SystemAA, SystemE, $textColor="blue", $lineColor="blue", $offsetY="-10")
    UpdateRelStyle(SystemAA, SystemC, $textColor="blue", $lineColor="blue", $offsetY="-40", $offsetX="-50")
    UpdateRelStyle(SystemC, customerA, $textColor="red", $lineColor="red", $offsetX="-50", $offsetY="20")

    UpdateLayoutConfig($c4ShapeInRow="3", $c4BoundaryInRow="1")
mindmap
  root((mindmap))
    Origins
      Long history
      ::icon(fa fa-book)
      Popularisation
        British popular psychology author Tony Buzan
    Research
      On effectiveness<br/>and features
      On Automatic creation
        Uses
            Creative techniques
            Strategic planning
            Argument mapping
    Tools
      Pen and paper
      Mermaid
timeline
title History of Social Media Platform
2002 : LinkedIn
2004 : Facebook
: Google
2005 : Youtube
2006 : Twitter
sankey-beta

%% source,target,value
Electricity grid,Over generation / exports,104.453
Electricity grid,Heating and cooling - homes,113.726
Electricity grid,H2 conversion,27.14
xychart-beta
title "Sales Revenue"
x-axis [jan, feb, mar, apr, may, jun, jul, aug, sep, oct, nov, dec]
y-axis "Revenue (in $)" 4000 --> 11000
bar [5000, 6000, 7500, 8200, 9500, 10500, 11000, 10200, 9200, 8500, 7000, 6000]
line [5000, 6000, 7500, 8200, 9500, 10500, 11000, 10200, 9200, 8500, 7000, 6000]
block-beta
columns 1
db(("DB"))
blockArrowId6<[" "]>(down)
block:ID
A
B["A wide one in the middle"]
C
end
space
D
ID --> D
C --> D
style B fill:#969,stroke:#333,stroke-width:4px
---
title: "TCP Packet"
---
packet-beta
0-15: "Source Port"
16-31: "Destination Port"
32-63: "Sequence Number"
64-95: "Acknowledgment Number"
96-99: "Data Offset"
100-105: "Reserved"
106: "URG"
107: "ACK"
108: "PSH"
109: "RST"
110: "SYN"
111: "FIN"
112-127: "Window"
128-143: "Checksum"
144-159: "Urgent Pointer"
160-191: "(Options and Padding)"
192-255: "Data (variable length)"
architecture-beta
group api(cloud)[API]

    service db(database)[Database] in api
    service disk1(disk)[Storage] in api
    service disk2(disk)[Storage] in api
    service server(server)[Server] in api

    db:L -- R:server
    disk1:T -- B:server
    disk2:T -- B:db